
文章来源:http://www.imtr.cn/html/n258.html
首先在后台的“SQL命令行工具”给栏目增加一个新字段typeicon,这个新增的字段名称可以自行修改。
alter table `dede_arctype` add `typeicon` char( 255 ) not null default '';
请注意dede_arctype数据表的前缀。
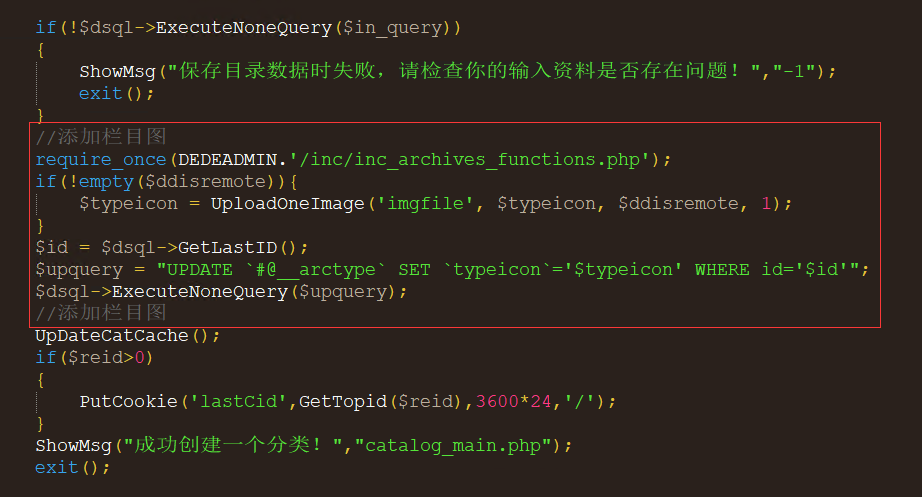
接下来修改文件,打开后台目录下的catalog_add.php,搜索if(!$dsql->ExecuteNoneQuery($in_query)),在这个判断语句结束的位置增加以下代码:
注意代码中的数据表前缀dede_arctype
    //添加栏目图
    require_once(DEDEADMIN.'/inc/inc_archives_functions.php');
    if(!empty($ddisremote)){
		$typeicon = UploadOneImage('imgfile', $typeicon, $ddisremote, 1);
    }
        $id = $dsql->GetLastID();
        $upquery = "UPDATE `dede_arctype` SET `typeicon`='$typeicon' WHERE id='$id'";
        $dsql->ExecuteNoneQuery($upquery);
    //添加栏目图
如图所示,不要加错地方
继续修改模板文件,打开后台目录的/templets/catalog_add.htm
搜索栏目名称,在</tr>的结尾处增加以下代码:
		  <!-- 添加栏目图标 -->
          <script language="javascript" src="js/catalog.js"></script>
          <tr>
            <td height="24" colspan="5" class="bline">
          	  <table width="800" border="0" cellspacing="0" cellpadding="0">
          	    <tr>
          		  <td height="26" style="padding-left:10px;width: 100px;">栏目图标:</td>
          		    <td width="482">
          			  <table width="100%" border="0" cellspacing="1" cellpadding="1">
          				<tr>
          				<td height="30">
          				  <div id="divsmallpicview" class="divpre" style="display:inline-block;"></div>
          				  <input type="hidden" name="typeicon" id="typeicon" style="width:320px" value="" />
          				  <input type="button"  value="选择图片" style="width:70px;cursor:pointer;" />
          				  <iframe name="upsmallpicfra" id="upsmallpicfra" src="" width="200" height="200" style="display:none"></iframe>
          				  <span class="litpic_span"><input name="smallpic" type="file" id="smallpic"  onChange="SeePicNew(this, 'divsmallpicview', 'upsmallpicfra', 165, 'catalog_add.php', 'save', 'smallpic', 'typeicon');" size="1" class="np coolbg" style="cursor:pointer;height:20px;margin-left:-20px;opacity:0;width:85px;"/></span>
          				</td>
          				</tr>
          			  </table>
          			</td>
          		  <td width="160" align="center"></td>
          		</tr>
          	  </table>
          	</td>
          </tr>
		  <!-- 添加栏目图标 -->
如图所示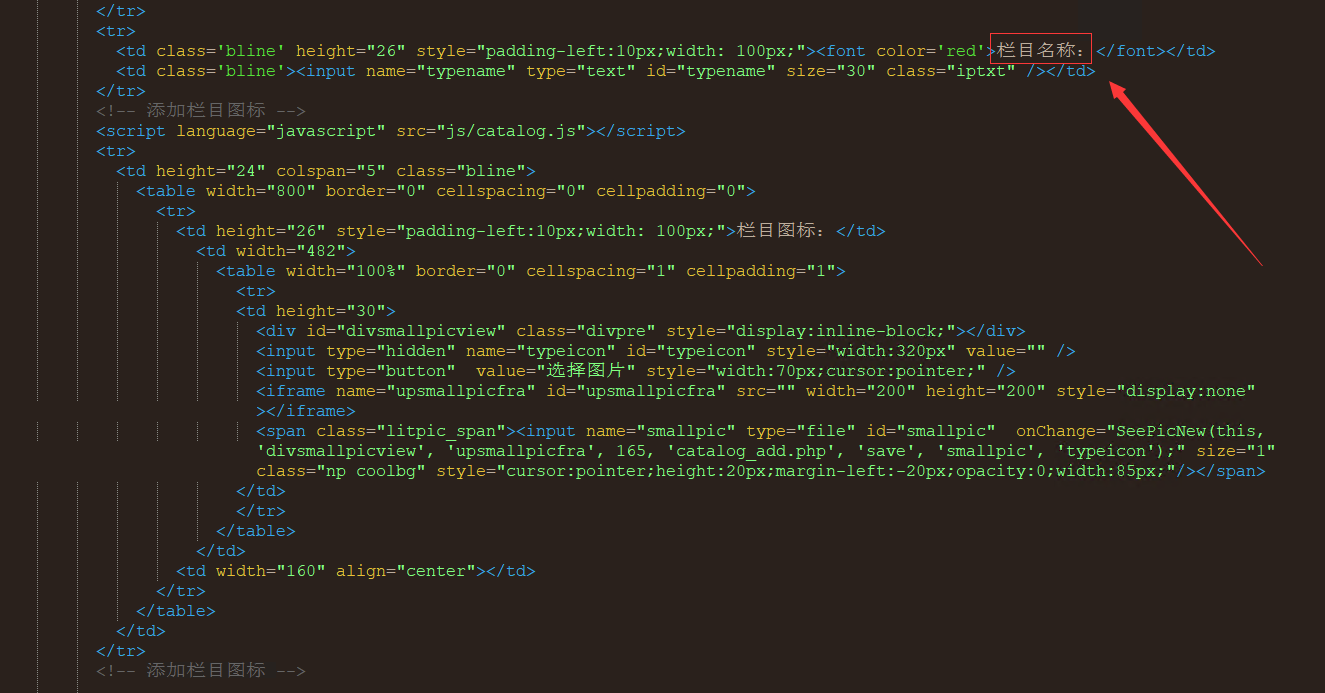
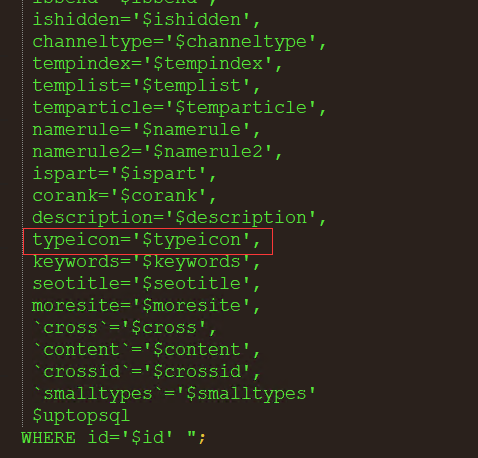
接下来修改后台目录下的catalog_edit.php,搜索description='$description',大概在54行,在其下面增加一句
typeicon='$typeicon',
如图:
再打开/templets/catalog_edit.htm,搜索栏目名称,在</tr>的结尾处增加以下代码(和catalog_add.htm的修改步骤一样):
<!-- 添加栏目图标 -->
<script language="javascript" src="js/catalog.js"></script>
<tr>
	<td height="24" colspan="5" class="bline">
		<table width="800" border="0" cellspacing="0" cellpadding="0">
			<tr>
				<td height="26" style="padding-left:10px;">栏目图标:</td>
				<td width="482">
					<table width="100%" border="0" cellspacing="1" cellpadding="1">
						<tr>
							<td height="30">
								<input name="typeicon" id="typeicon" type="text" style="width:320px" value="<?php echo $myrow['typeicon']?>" />
								<input type="button"  value="选择图片" style="width:70px;cursor:pointer;" />
								<iframe name="upsmallpicfra" id="upsmallpicfra" src="" width="200" height="200" style="display:none"></iframe>
								<span class="litpic_span"><input name="smallpic" type="file" id="smallpic"  onChange="SeePicNew(this, 'divsmallpicview', 'upsmallpicfra', 165, 'catalog_edit.php', 'save', 'smallpic', 'typeicon');" size="1" class="np coolbg" style="cursor:pointer;height:20px;margin-left:-20px;opacity:0;width:85px;"/></span>
							</td>
						</tr>
					</table>
				</td>
				<td width="160" align="center">
					<div id="divsmallpicview" class="divpre"><img height="50" src="<?php if($myrow['litimg']!="") echo $myrow['litimg']; else echo "{$myrow['typeicon']}";?>"></div>
				</td>
			</tr>
		</table>
	</td>
</tr>
<!-- 添加栏目图标 -->
自此,修改完成。
原文地址:http://www.imtr.cn/html/n258.html